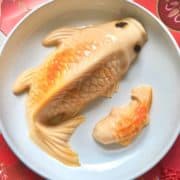
CNY Koi Fish Jelly (Easy Chinese New Year Dessert)
A popular CNY dessert that is easy to make yet stunning and delicious!
Servings: 8 people
Equipment
- Pot
- Heat proof whisk
- Glazing brush Alternatively, use the back of a spoon
- Koi fish mold
- 4 equal sized bowls or cups Alternatively, use a baking tray/ high rimmed platter and uncooked beans/ rice to balance the mold
Ingredients
- 1 packet Pre-sweetened agar agar powder Check the back of your agar agar packet to make sure they don't have different instructions on their agar agar: water ratio- if they do, follow what's on the packet. If your agar agar doesn't contain a sweetener, add some white granulated or white caster sugar to give it some taste.) Substitute: Konjac powder or gelatine if not vegan
- 11.7 oz evaporated milk (333g) Substitute: regular milk or plant-based milk.
- 23.5 oz water (667g)
- Yellow, orange and/or red food colouring You only need a few drops
- 2 dried raisins/ blackcurrants/ sultanas per fish 1 litre of jelly could be used to make 3 koi fishes, based on my mold, but different molds have different sized fish so yours may be different.
- edible gold paint or glitter Optional
Instructions
- Add the evaporated milk and water to the pot, whisk whilst adding the agar agar powder- note the fire is NOT on at this point in time and the liquid should be cold/ room temperature.
- Once you've stirred the agar agar in, switch on the fire and bring the pot to the boil. Keep stirring till the powder is all dissolved, then reduce the heat to keep the agar agar warm (so that it won't set).
- Use your tweezers or chopsticks to dip the raisin into the agar agar then press it firmly to the mold, where the eye of the fish is, and hold it there till it's stuck to the mold. Repeat till all the eyes have been filled out.
- Scoop 2-3 tablespoons of agar agar liquid into 2 bowls, then add a few drops of food coloring to the bowls. (1 colour per bowl. If you're using 3 colours, you will need 3 bowls.) Mix the coloring and the liquid jelly well- use different spoons for each bowl and don't cross contaminate the colours!
- Using a pastry glazing brush or the back of the spoon, thickly paint on some yellow/ orange/ red patterns onto the fish mold to mimic the strips of a koi fish (See the post for a photo)- start with the lighter colour then move on to the darker colour.
- Give the coloured stripes some time to set on the mold- you don't want it to melt into the hot jelly when you fill up the rest of the fish!
- Now either balance the mold on 4 same-sized bowls (1 bowl per corner) OR pour a lot of uncooked rice/ beans onto a baking tray and push the mold into them so that they hold it level (See post for the pros and cons of each method.) In this post, I used the 2nd baking tray method.
- After the mold is as level as u can make it, use 1 hand to hold the mold, and the other hand to stir the jelly to make sure it's still liquid, then slowly scoop the hot jelly into the molds. Make sure you don't burn yourself!
- Scoop till all the fish molds are filled then leave to set at room temperature for 1 hour till it's a little more solid then transfer to the fridge for another 2-3 hours. (I let it set before moving it to the fridge so that I can minimise spillage.)
- After 2-3 hours, the jelly has set, and you can remove it from the mold and plate it. You can either pop the mold to get the jelly out or if it's stuck, gently run a knife along the edges to help it out. Be very careful of the fins as they tend to be thin and break easily. Optional: brush some edible gold dust on the back of the fish!
- Best enjoyed eaten chilled. Happy Chinese New Year everyone!
Notes
Note: not recommended to serve konjac jelly to the very young or old due to choking concerns.